
Sound impossible? Well, then, try making jewellery while lying on the couch, drinking a coffee, driving...
Some of the most fruitful creative moments don't occur at the bench. Why? As Einstein said: 'Creativity is the residue of time wasted'. When we are relaxed we are focused inward toward unexpected connections. This work takes place in the right hemisphere of our brain. This hemisphere is uniquely able to make unique associations that lead us to those eureka moments. There are problems that our analytical left hemisphere can not solve.
Wednesday, May 30, 2012
Wednesday, May 23, 2012
Hello everyone!
My name is Liane Vaz and I am the new summer intern at Jewel Envy! I just finished my third year at OCAD University in the Jewellery & Metalsmithing program.
My passion for jewellery began in high school - where we had a Design program that included ceramics, glass, fiber, and jewellery. Contrary to what most people think - we worked with sterling silver and not beads! At the time I had not realized the value of silver since we didn't have to pay for it up front (we paid a $30 studio fee at the beginning of the year and that was it). Looking back, I wish I saved every off-cut and every gram of silver!
At OCADU, I had a leg up for a little while because I already knew basic things like how to use a jeweller's saw and how to solder. I believe that this previous knowledge allowed me to grasp other concepts and techniques as time went by and as I learned more advanced processes.
After a History of Jewellery class at OCADU, most of the people in my class (including myself) realized that we did not know a lot about contemporary jewellers. One of my goals this summer is to research and learn all I can about contemporary jewellers - I think I'm doing pretty well so far since I am now working amidst several contemporary jewellers here at Jewel Envy!
Another goal for this summer is to refine my finishing skills. Sadly, jewellery finishing is often thrown under the bus when we're trying to meet deadlines at school. Also, learning new techniques or variations on old ones would be an amazing thing to have under my belt as I go into my fourth and final year at OCADU. Finally, I would like to pick Gillian’s brain and learn the business side of the jewellery trade and how I can own and run my own studio sometime in the future!
I'm looking forward to learning and doing and creating this summer!
Liane
Monday, May 21, 2012


Wednesday, May 9, 2012
How To: Stone Setting Using Protoplast
To those of you wandering onto this site wondering, "What does cellular biology have to do with jewellery making and stone setting, what the heck?" I apologize. For the rest of you, I will now get down to business. Protoplast has made its way into my regular useful tool rotation along with chopsticks. All of this will soon make sense in the pictures below, I promise. - Alexis *if you go to my blog you can check out the finished rings used for the how to pics!*
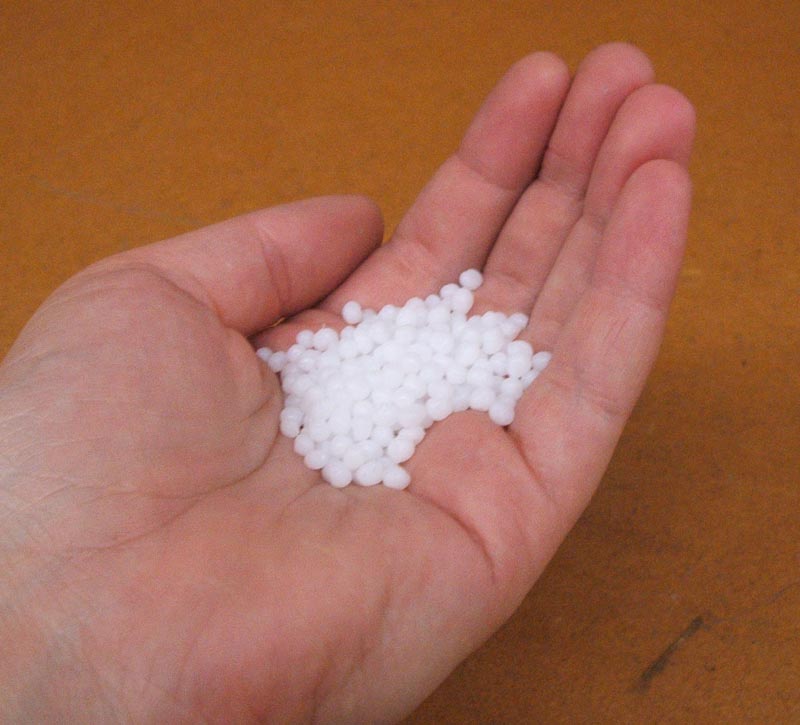 |
| This is protoplast! When it's brand spanking new it comes in little pellets. To use them simply heat some water, pour it into a container and immerse them. Usually a small handful suffices. |
 |
| When placed in hot water the protoplast "melts" together into a blob. As you can see, the one on the left is completely clear, it is ready for use. The one on the right is still opaque in the center, so it needs a bit more time in the water. To remove the protoplast remember to use tongs - the water will still be hot! |
 |
| As you can see, the protoplast becomes very soft and malleable. You can use it to encompass and anchor your piece in place to start setting. |
 |
| I quickly molded the protoplast around the shank of a ring. This is going to help protect the polished surface and serve as my anchor to hold the ring in place. |
 |
| I placed the ring into a clamp & squeezed it a bit so that the protoplast conforms to the shape. I waited a minute for the protoplast to cool completely. When this happens it becomes a hard plastic. If you try to push into the surface it holds it shape. At this point it's time to get 'er done! |
 |
| For setting I have become accustomed to using a chasing hammer along with a bezel pusher made from a chopstick (for more on that see below). |
 |
| Here I am doing my thang! tappa tappa... |
 |
| After you have completed setting to remove the protoplast you simply place the piece into hot water. Once it has become clear you can remove it from the piece - remember to be careful, it gets hot! |
 |
| When I remove the protoplast I make sure to form the blob into a pancake shape. This way the next time I want to use it, it will become malleable really quickly. |
 |
| To create my bezel pusher I used a section of a plastic chopstick and sanded the tip into the shape that is shown in my drawing. It is similar to the toothbrush bezel pusher that Tim McCreight suggests in The Complete Metalsmith. I find it very useful as a setting tool because it reduces the risk of chipping or scratching a soft stone and is especially great when I am setting enamel components. |
 | ||||
| For flat pieces - pendants, earrings, brooches, etc. I use the protoplast along with a used up wooden block. I place the soft protoplast on top of the block squishing it into the drilled holes and then placing whatever piece I am working on top squishing the protoplast around it to anchor it into place. The block can than be held in a vise to keep everything stationary After you have finished setting you can remove the protoplast by sliding a screwdriver underneath it to pop it off the wood block so that you can once again place it into hot water to remove your piece. As you can see in this photo, after a little while your protoplast will start to look dirty. |
Subscribe to:
Posts (Atom)
Studio

Where we create!

